

Godkänn kakor
Vi använder oss av kakor (cookies) för att vår webbplats ska fungera bra för dig. De används även för webbanalys i syfte att hjälpa oss att förbättra våra tjänster.
Så använder vi cookies

Go back and forth between these steps to make sure everything's right. This order is not set in stone, this order is just a starting point and a guide line.
Source: https://fb.watch/jsuIsePX-g/
https://www.youtube.com/watch?v=MON0vGi7mBA
If your bow is in perfect time, both arrows will hit the tape or they will land on the same horizontal plane. (Level with the tape or on the tape)
If the "creep" shot hits HIGH, TIGHTEN or SHORTEN the cable that connects to the BOTTOM cam.
If the "creep" shot hits LOW, TIGHTEN or SHORTEN the cable that connects to the TOP cam.
Make very small, one or two turn, adjustments a time. A little twist goes a long way.
Source: The Creep Tune Procedure by George Ryals
https://www.archerytalk.com/threads/creep-tuning.453865/
Results of torquing a compound bow
How to torque tune a compound bow
Usually what has to happen in most setups is that the rest has to come back and the sight may have to be moved forward or back to fine tune it. The rest is the primary adjustment because it is close to the nocking point and therefore less of a movement at the rest will make more of a change downrange. Here are the steps:
As a target face, use a vertical strip of tape, string, or line.
NOTE: Torque the bow just a little bit more than you would do accidentaly or you run the risk of derailing your string. Also make sure that when you're torqueing, you still need to put the pin in the middle and center the peep to the scope for an accurate read.
You can also move the sight in or out if that is an available option to you and that will allow some fine tuning also. It has less of an effect than the rest due to its position further away from the nocking point. Once you get this done you will be amazed at how much better your bow will shoot.
Source: https://shootingtime.com/archery/torque-tuning-compound-bow/
Before You Tune
Before we start breaking down these different tuning methods I want to stress something. While the tune of our bows definitely impacts arrow flight, it isn't the only variable to account for. The wrong arrow setup, improper bow fit, and poor shooting technique will compromise arrow flight out of a “tuned” bow. Before you get serious about tuning, you need to make sure — to the best of your ability — that your bow setup (draw length, draw weight, etc.) is sound and that you are shooting a properly spined arrow.
Right alongside the equipment end of things, make sure that your shooting abilities provide the consistency and accuracy needed to judge the capabilities of your bow.
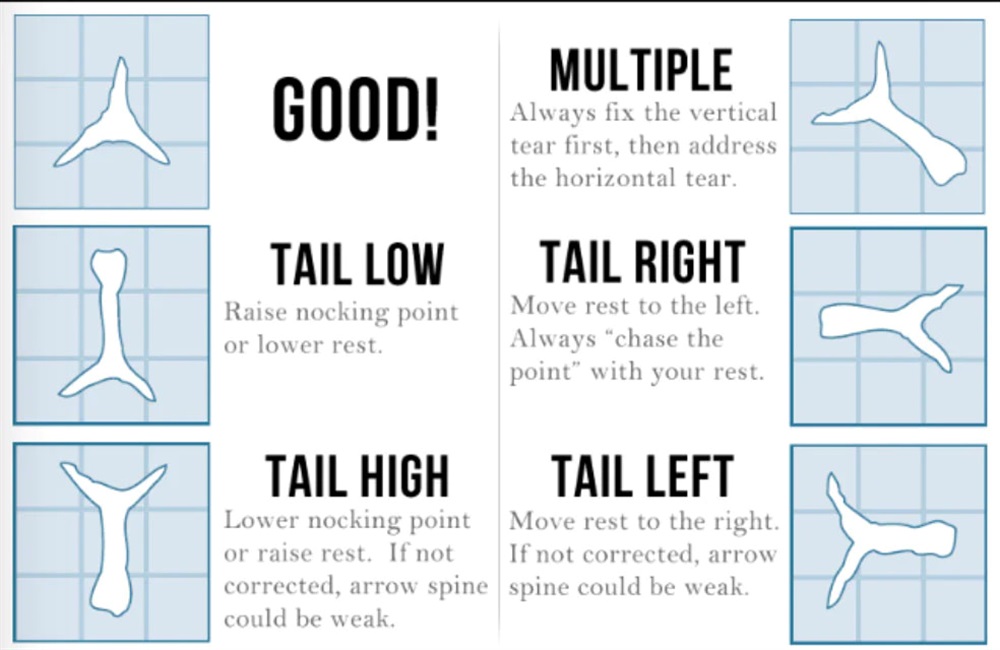
Paper Tuning
Paper tuning is just what it sounds like — a shooter fires an arrow through a sheet of paper that is suspended in place by some sort of frame to hold the paper with tension. That frame is placed a few feet in front of a target. Shooting through the paper sheds light on whether the arrow is in fact flying straight out of the bow. If it is, you'll see what is often referred to as a perfect “bullet hole”. If the arrow is flying with any misdirection, then the paper will show a directional “tear” instead of a bullet hole.
The amount and direction of the tear will tell you how to tune the bow to get the perfect bullet hole. The most common and user-friendly, way of addressing a tear is to make very slight adjustments to the arrow rest of the bow. Only very small adjustments are often needed, which is one of the many benefits of using a micro-adjustable arrow rest.
Note: A sight adjustment will be required after you move your rest.
There are other ways to influence the tear, including twisting/untwisting cables, stiffening/weakening arrow spine, decreasing/increasing draw weight, adding/taking away point weight, and adding/taking away tail weight to name a few. It gives a person options that can cater to their own personal goals with their setup.
If an adjustment to your rest doesn't provide the expected results and you continue to see a consistent tear pattern, then you likely have other issues to deal with — such as an arrow spined improperly for your bow setup, or a shooting form issue, such as improper grip and “torque” applied to the bow.
Source: https://exomtngear.com/blogs/article/comparing-bow-tuning-methods
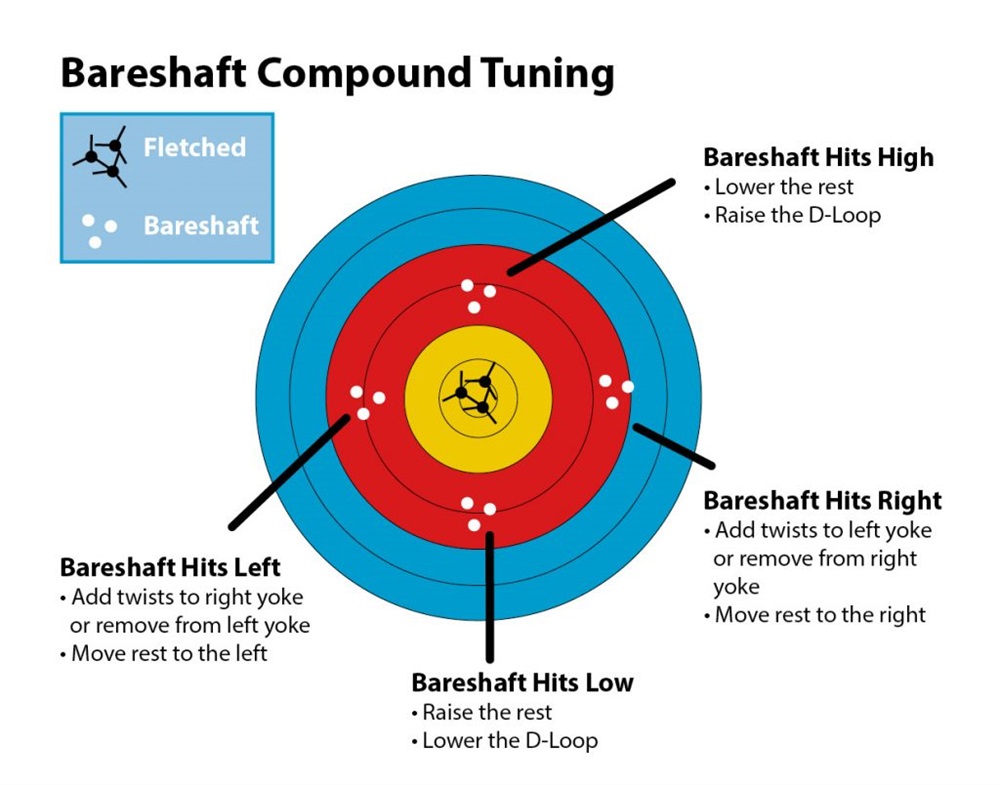
Bareshaft Tuning has been getting a lot of attention in recent years and it's for good reason. There is no better way to tell if an arrow is flying straight than to take off “the training wheels” that help make your arrows fly straight, which are the arrow's fletching or vanes. Since vanes help correct arrow flight, removing them will reveal how an arrow flies without “correction”. You bare shaft tune through paper, but I am going to go over “group tuning” with bare shafts in this article.
Group tuning with bare shafts is where one shoots both fletched shafts and bareshafts together at the same dot in order to show any variance between the two. Before trying this, you need to have your fletched shafts grouping well together. Once they are, stand at 20 yards and shoot a fletched shaft followed up with a bare shaft. In a perfect world, they'll be in the same dot hugging together. If that's the case, you're good to go. If not, here's what you do to make that happen:
Make VERY small adjustments (1/64" to 1/32") to the arrow rest...
Note: A sight adjustment will be required after you move your rest.
As with the other methods that require you change the position of your rest, you will need to adjust your bow site after making changes. As long as the bare shaft and fletched shaft are hitting together though, you've succeeded. And just like paper tuning there are other ways to influence the flight of a bare shaft other than the rest. Adjusting draw weight, cutting arrow length, adding point weight/taking away point weight, etc.
If after making these adjustments the two arrows are not coming together, you could have something else going on. For instance, if a bare shaft is hitting right and you can't get it to move closer to your fletched arrow, this indicates a weak arrow spine and the opposite is true for hits to the left. And up/down variances could mean there is a cam timing issue or even nock pinch going on.
Source: https://exomtngear.com/blogs/article/comparing-bow-tuning-methods
Walk Back Tuning and French Tuning are what I'd call the most user friendly of the tuning methods we'll go over here. Both of these are incredibly similar, which is why I lumped them together. They are both doing essentially the same thing, in the same way.
Walk Back Tuning is where a person shoots an arrow from 10-20 yards at a target with a vertically placed piece of tape running from top to bottom and moves back incrementally 10 yards at a time. The whole time aiming at the same dot with the same pin. Make sure your top pin is sighted-in perfectly to this dot. The logic here is to show left/right variance gradually as the arrow falls and one moves back. The goal is getting no variance at all in the end.
Remember, you are using the same aim point and the same sight pin the entire time. As you move back in distance, your arrows will hit lower. We are concerned with the horizontal direction (left or right) those arrows are moving, not with height.
These adjustments are all done with the arrow rest:
Note: A sight adjustment will be required after you move your rest.
French Tuning is a more condensed and efficient way of Walk Back Tuning. You'll start with a target placed at 3 yards and aim at the bullseye with your 50 yard pin. This should put you dang near center of the dot. Your arrow needs to be hitting absolutely dead center before the next step. If that means moving your sight a smidge, then do it. Be picky here. Once it's good, it's time to move on.
From there, move the target out to 50 yards and take another shot. If there is a left/right variance move your rest slightly in the opposite direction of the variance, just like you would with walk back tuning. After doing so, you'll have a minor sight adjustment to get back in the center at 3 yards. Do this until you're in the center at both 3 yards and 50 yards.
Source: https://exomtngear.com/blogs/article/comparing-bow-tuning-methods


Vi använder oss av kakor (cookies) för att vår webbplats ska fungera bra för dig. De används även för webbanalys i syfte att hjälpa oss att förbättra våra tjänster.
Så använder vi cookies